- Introduction To The Rule Of Thirds
- Applying the Rule of Thirds To Your Photos
- Advantages of Using the Rule of Thirds
- Common Mistakes to Avoid
- Advanced Techniques and Variations
- Other Photography Rules To Combine With The Rule Of Thirds
- Examples of Using the Rule of Thirds
- How to Apply the Rule of Thirds to Landscape Photography
- When to use the Rule of Thirds in Portraits?
- Using The Rule of Thirds In Sports Photography
- How to Apply the Rule of Thirds to Street Photography
- Where To Use The Rule Of Thirds In Wildlife Photography
- The Rule of Thirds in Post-Processing
- Summing Up The Rule Of Thirds In Photography
- Frequently Asked Questions
Introduction To The Rule Of Thirds
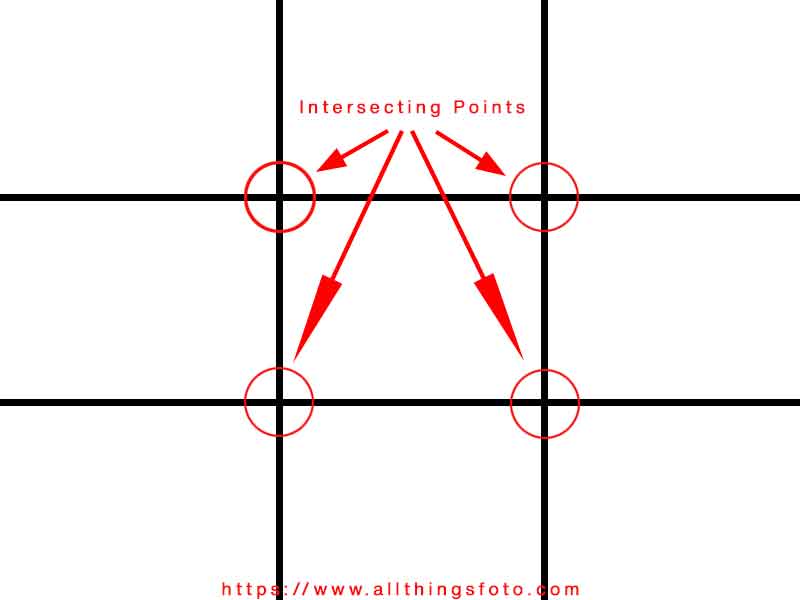
The Rule of Thirds has gained widespread acceptance among photographers as the most prominent ‘rule’ in photography. In this article I explain all the basics of the rule of thirds. Afterwards, get ready to embark on experimenting with them.
When using the rule of thirds think of a set of grid lines over your canvas. Remember the game tic-tac-toe from your childhood?
The Rule of Thirds grid is a fundamental principle in photography. It involves dividing an image into a 3×3 grid using two vertical lines and two horizontal lines. Position the main subject of the photo using the four intersecting points of these lines. Creating a more balanced and visually appealing composition.
Over centuries, artists have adopted this technique, which has gained recognition as an essential rule of composition for photographers.
Applying the Rule of Thirds To Your Photos
Photographers can apply the Rule of Thirds in various ways, including:
- using gridlines and overlay techniques
- vertical and horizontal placement
- intersection points, and diagonal lines

The simplest method is to use the gridlines or overlay technique provided by your camera or smart phone. Which superimposes the thirds grid over the live view screen or in the viewfinder. This enables you to position your subject in line with one of the gridlines. Or at any of the four intersection points, for a more balanced and harmonious composition.
When it comes to vertical placement, you can use the vertical lines on the grid to position your subject on the left or right-hand third of the frame. Depending on which direction they are facing or the direction of movement in the photo. This creates a sense of balance and makes the image more aesthetically pleasing.
Horizontal placement involves positioning your subject along the upper or lower third of the frame, depending on the desired effect. This helps to create a sense of depth and interest, making the image more dynamic.
The intersection of four points, where the grid lines intersect, are the most visually appealing areas of the frame. Positioning your subject at one of these four intersection points draws the viewer’s eye to the focal point of the image. Consequently, creating a more engaging and effective visual narrative. It also helps to balance the negative space in the remaining two thirds of the grid.
Using diagonal lines is another way to create dynamic compositions. By placing your subject along one of the diagonal lines created by the rule of thirds grid, you add energy and interest to the image.
Last But Not Least
Try to stay away from placing your main subject perfectly centered in the grid. Placing your main subject dead center restricts the viewers eye from progressing naturally around the image. The human eye starts viewing from left to the right with the exception of animals, people and strong main subjects.
Advantages of Using the Rule of Thirds
The Rule of Thirds is a powerful tool in photography. It has several advantages that help you create more engaging and effective compositions. By using this technique, you can create better compositions that draw the viewer’s eye to the main subject of the photo. Positioning your subject along one of the gridlines or at an intersection point adds depth and interest to the image, making it more visually appealing.
The Rule of Thirds also enhances visual storytelling by creating a sense of balance and harmony in the image.
The advantages of using the rule in photography are many. Remember to use the Rule of Thirds as a guideline rather than a strict rule. And don’t be afraid to break it when necessary to achieve the desired effect.
Common Mistakes to Avoid
One should be mindful of avoiding common mistakes in composition for photography or design. The following photography tips should help you avoid common mistakes.
One of them is completely ignoring the Rule of Thirds. By ignoring the rule of thirds, your composition suffers. However, overusing the Rule of Thirds can also be detrimental. It is important to strike a balance and consider other compositional techniques as well.
Poorly executed placement is another mistake you should avoid. Placing the subject or important elements haphazardly can lead to a cluttered or unbalanced composition. It’s crucial to carefully consider the placement of the key element and ensure it enhances the overall visual appeal.
Additionally, not taking into account the subject and context can result in disconnected or irrelevant compositions. Understanding the subject’s characteristics and the context in which it exists will help create a stronger and more meaningful composition.
By being mindful of these common mistakes and practicing good composition techniques, you can greatly improve the impact and visual appeal of your photographs or designs.
Advanced Techniques and Variations
While the Rule of Thirds is a popular guideline in composition, advanced techniques and variations can add depth and creativity to your photographs. One such technique is intentionally breaking the rule. By placing your subject or key elements outside of the thirds rule gridlines, you can create a sense of tension or draw attention to unconventional compositions, resulting in visually striking images.
Another technique is incorporating the Golden Ratio, a mathematical concept that provides a visually pleasing balance. Also known as the Golden Rule it occurs frequently in nature.
It involves dividing the frame into rectangles, with one being approximately 1.618 (Phi) times larger than the other. Applying this ratio to the placement of elements creates a natural and relaxed appearance in your composition.
Another rule similar to the Golden Ratio is the Fibonacci Spiral. Both use Phi (pronounced “pie”) to achieve similar mathematical results. The Fibonacci Spiral divides the frame into squares while the Golden Ratio divides the frame into rectangles.


Other Photography Rules To Combine With The Rule Of Thirds
Other photography tips and rules that fit well with the rule of thirds are: Framing, Leading Lines, the F/8 rule, the Golden Hour, the Golden Triangle, sunny 16 rule and the Rule of Odds. Using these rules while placing your elements in the grid lines of the rule of thirds only makes your photos better.
Exploring compositions with multiple subjects and patterns is another way to enhance your photography. By carefully arranging and balancing multiple subjects, you can create a sense of harmony or contrast. Patterns, such as repeating shapes or textures, can also add visual interest and lead the viewer’s eye through the image. This works well in landscape photography.
Lastly, utilizing the Rule of Thirds across different genres of photography can yield unique and compelling results. While typically associated with landscapes and portraits, this guideline applies to various subjects, including architecture, wildlife, or street photography. Experimenting with the rules in different genres can offer fresh perspectives and enhance the visual impact of your images.
By delving into these advanced techniques and variations, you can elevate your compositions and unlock new creative possibilities.
Examples of Using the Rule of Thirds
- Landscape photography
- Portrait photography
- Sports photography
- Street photography
- Wildlife photography
How to Apply the Rule of Thirds to Landscape Photography
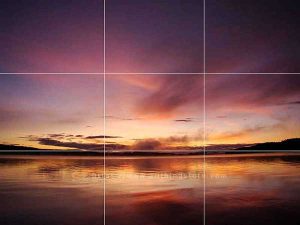
When using the rule in landscape photography, imagine a 3×3 grid overlay on your frame.
Position the horizon line along the upper horizontal line or lower horizontal line to emphasize the sky or foreground.
I use the lower third grid line when trying to capture a beautiful sunrise or sunset reflection that lights up the whole sky. By placing the horizon line on this grid I am able to emphasize the colors of the sunset for the sky and foreground effectively.
Place key elements, like a tree or mountain, along the intersecting lines to create balanced and visually appealing landscape shots.
When to use the Rule of Thirds in Portraits?
In portrait photography, you use the Rule of Thirds to create a pleasing and balanced composition.
Place the subject’s eyes along one of the upper gridlines, with ample empty space in front of their gaze. If the subject is gazing to the right place them along the left thirds intersections. Consequently, visa-versa for a subject looking to the left.
Aligning key facial features or elements, such as the mouth, subject’s shoulders or hands, with the gridlines can add visual interest.
Using The Rule of Thirds In Sports Photography
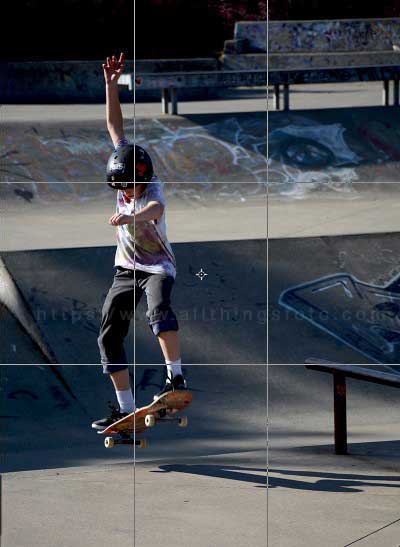
Use the rule in sports photography to portray action or movement. Try to blur out the background when you can but it’s not always necessary. Place your subject to the left or right of dead center depending on the direction of movement.
I usually like to place my subjects in the left grid as humans naturally view images from left to right. Take advantage of the vertical and horizontal lines to align your subject. By using different third lines you provide a more engaging photographic experience for the viewer.
How to Apply the Rule of Thirds to Street Photography
When applying the Rule of Thirds to street photography, observe the dynamic scenes around you. Position key elements, like people or interesting objects, along the gridlines or at the intersections.
Experiment with different compositions to create a balanced and visually compelling narrative within the urban environment. As with sports photography, motion provides a challenge when using the grid lines to place your subjects. If your focus is on print photography than your auto focus and shutter speed is crucial to shooting actions in street photography.
Where To Use The Rule Of Thirds In Wildlife Photography
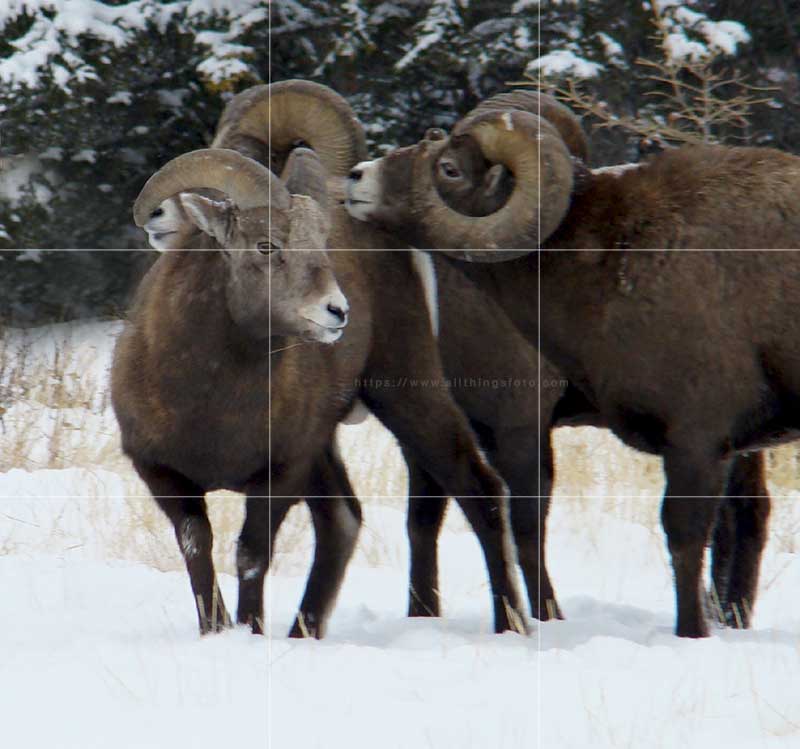
In wildlife photography, you use the rule to enhance composition and draw attention to the subject.
Position the animal’s eyes or key features where the lines intersect, creating a dynamic and balanced image.
In the image of the Big Horn Sheep, I placed the younger rams eye on the upper left intersection point to make him the center of attention. The older rams were flexing their muscle during the rut.
Consider the natural surroundings and incorporate negative space to convey a sense of habitat and environment.
The Rule of Thirds in Post-Processing
Apply the Rule of Thirds in post-processing to enhance the composition and visual impact of your images. One way to utilize this composition guideline is through cropping.
When cropping an image, you can use the rule as a guide to reposition and align the key elements within the frame. By following the gridlines or placing important elements at the intersections, you can create a more balanced and visually pleasing composition.
Editing software like the AI driven Photoshop provides powerful tools to incorporate the Rule of Thirds during post-processing. You can use guides or overlay grids to align and position elements according to the rule.
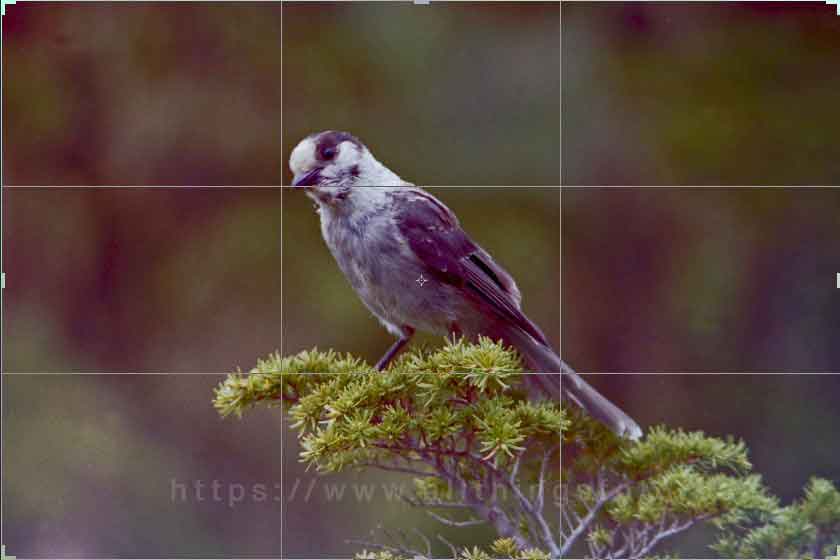
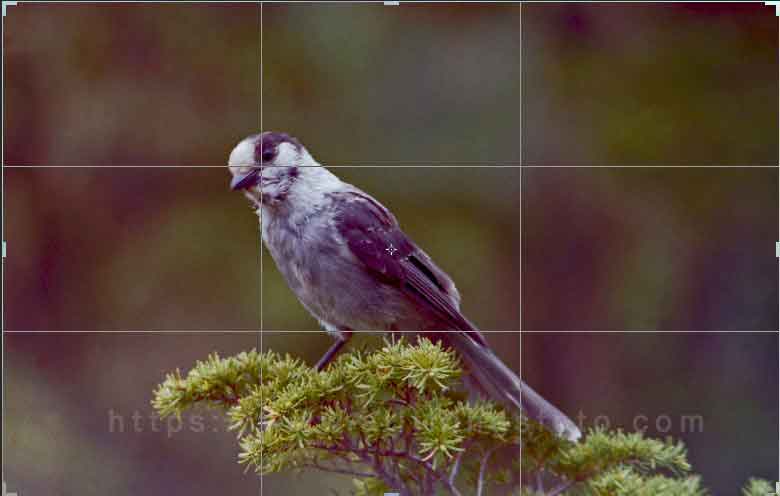
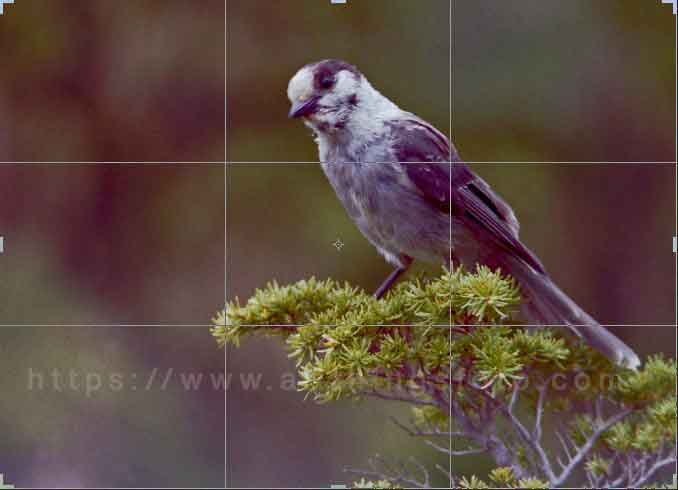
Additionally, Photoshop offers the ability to create a 3×3 grid using the Crop tool, making it easier to visualize and apply the Rule of Thirds during the editing process. Adjusting the composition based on this rule can lead to a more harmonious and visually engaging image.
Below are 4 photos of a Gray Jay (A.KA. Whiskey Jack) that I took while hiking back in the day. I was just learning photography which explains the poor exposure in the original and lack of focus. These examples show what post processing can do to improve an image. In the second image, I used the exposure setting tool in photoshop cs6 to improve the overexposed original. After which, I used the rule of thirds grid line to crop the last two. What result do you like best?

Summing Up The Rule Of Thirds In Photography
In conclusion, the Rule of Thirds is a powerful tool that can help you create more balanced and visually appealing compositions. By positioning your clear focal point along one of the gridlines or at an intersection point, you can create more depth and interest in your photos.
The Rule of Thirds is not only useful for composition, but it can also enhance visual storytelling by highlighting important subjects or objects. Try using two thirds of the grid to place your subject or important elements to lead your viewer’s eye.
While the Rule of Thirds is a guideline, not a rule, it’s important to understand and practice it in order to develop your own creative style. It’s a fundamental principle of composition that has stood the test of time and used by some of the greatest photographers in history.
However, it’s important to remember that breaking the rule can lead to creative and interesting results as well. Sometimes, breaking the rule can help you create a more unique and compelling image. So don’t hesitate to be creative and experimental.
To develop your eye for using the Rule of Thirds, study the works of other photographers and pay attention to how they use the technique. Experiment with different compositions and practice positioning your subject along the gridlines and intersection points. With time and practice, using the rule will become second nature and you’ll be able to apply it effortlessly to your own photography.
So next time you’re out taking photos, remember to use the Rule of Thirds as a guide to create more balanced and visually pleasing compositions. But don’t forget to break the rule occasionally and take risks to create something truly unique and special.
