Introduction To The Golden Hour Of Photography
What is Photography”s Golden Hour?
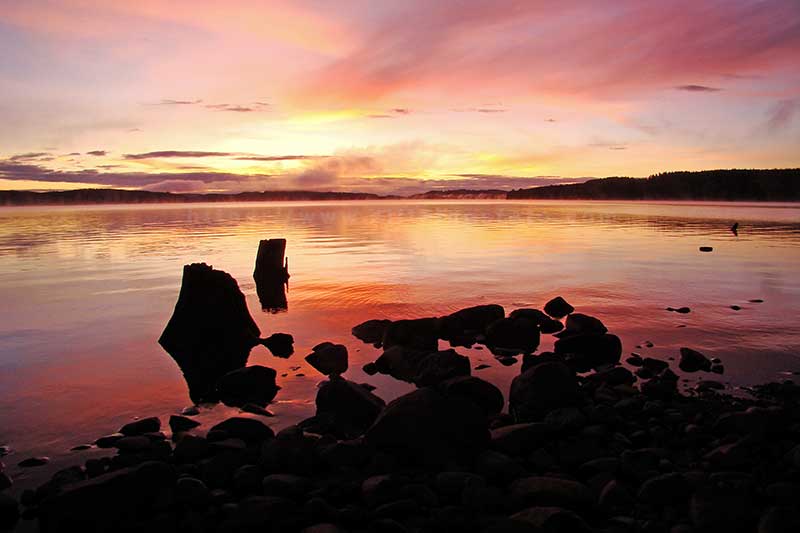
Photography’s Golden Hour (Magic Hour) refers to the period shortly after sunrise or before sunset.
For roughly an hour during this period, the natural light is softer, warmer and diffused.
This magical hour offers photographers a unique and captivating quality of light that enhances the beauty of their subjects.
During this timeframe, the sun is situated close to the horizon. It casts long shadows and creates a warm, golden hue that adds depth, dimension and a sense of tranquility to photographs.
The Golden Hour is valued by professional photographers because it brings out vibrant colors and reduces harsh contrasts. It also adds a captivating glow to landscapes, portraits and other genres.
The Golden Hour light has the ability to transform ordinary scenes into extraordinary ones.
Your photographs evoke mood, emotion and a sense of awe.
Mastering the art of capturing images during both Golden Hours can elevate the visual impact of photographs.
Why Are The Golden Hours In Photography So Special?
The Magic Hour is considered special and highly sought after by photographers for several reasons.
The quality of light during this time is truly magical. The sun’s low position in the sky creates a soft, warm, and diffused light that adds a captivating glow to subjects.
Photography’s Magic Hour offers photographers a multitude of creative opportunities. The long shadows cast during this time add depth, dimension, and visual interest to images. They can emphasize textures, patterns, and contours, adding a sense of drama and complexity to the composition. The warm, golden tones of the sunlight bring a sense of warmth and evoke emotions, enhancing the overall mood of the photograph.
Another reason why Golden Hour photography is special is the way it enhances colors. The gentle light intensifies colors, enhancing their saturation and visual appeal. This leads to visually striking and mesmerizing images that grab the viewer’s attention.
Furthermore, the gentle, indirect light of the Magical Hour reduces harsh contrasts and allows for better details and tonal range in photographs. This creates a more balanced exposure, preserving both highlights and shadows, resulting in visually pleasing and well-balanced photos.
The combination of the magical light, long shadows, warm tones and enhanced colors make your photography truly special. It allows photographers to capture breathtaking, ethereal and emotionally impactful images. These stunning photographs stand out and leave a lasting impression on viewers.
(Affiliate Link)
What Are The Benefits Of Photography’s Golden Hours?
While everyone loves the beautifully colored skies at dusk and dawn, there’s another compelling reason to make use of “golden hour” photography opportunities.
The Golden Hour occurs twice each day, once after sunrise and again just before sunset. Bathing the world in warm hues of yellow, orange and pink.
These times are particularly beneficial for landscape and travel photography because the soft, diffuse light creates better visual interest than mid-day sun.
But the real boon comes with lower light levels, resulting in longer shadows, which create texture and dimension within our compositions.
This is also true of portrait photography where we can benefit not only from the warm tones but also the long shadows, creating strong separation between our subjects and backgrounds.
Additionally, using such beautiful and easily accessible locations may attract more clients for weddings and portraits if you showcase them in your portfolio.
Understanding Photography’s Magical Hour
What Are The Exact Hours Of The Magic Hour
The exact duration depends on several factors. These include geographical latitude, seasonal variations and weather conditions. Generally speaking, the Golden Hour begins approximately 30 minutes after sunrise or 60 minutes prior to sunset. In the majority of places, this ranges from 30 to 60 minutes. Photographers agree the magic happens within those 45 minutes either side of the actual Golden Hours. I shoot most of my photos throughout the hour before and after both sunrise and sunset.

How To Calculate Timing For This Magical Hour?
Calculating the timing requires taking into account the current date, time of year and location of the observer. There are various online tools available that simplify this process, providing information on both the start and end time of the different regions.
I’ll describe the manual way to calculate the timing of the Golden Hour.
Given all the necessary parameters, performing manual Golden Hour calculation is feasible, albeit time-consuming. Online calculators are much quicker and easier to use, giving you reliable data without needing to spend too much effort. With the right resources, capturing stunning images during the Golden Hour becomes much simpler!
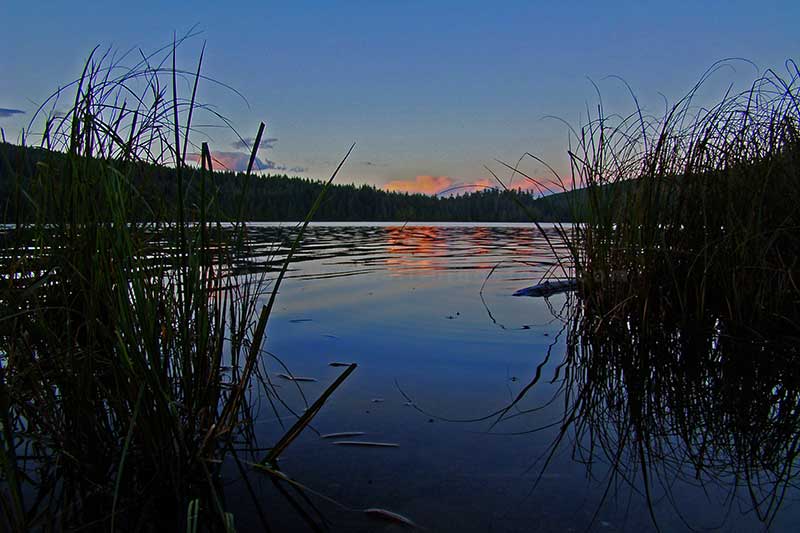
The Difference Between Photography’s Golden Hour And Blue Hour
In photography, the terms “Golden Hour” and “Blue Hour” refer to two specific moments during twilight hours. Both are popular among photographers due to the unique color casts they produce, but they differ in significant ways. The Golden Hour takes place after sunrise or before sunset, whereas the Blue Hour follows shortly after. The Golden Hour changes from vibrant oranges and yellows to rich blues and purples, as the sun sets. But, during the Blue Hour, the sky is fully dark, except for city lights, starry night skies or moonlit scenes. The main differences between the two lie in the intensity and directionality of light. At the beginning of the Golden Hour, the light is warmer and less harsh, but towards the end it gets dimmer and more spread out, producing even colors across entire landscapes. During the Blue Hour, contrast is high, shadows get longer and details are emphasized. The Blue Hour is perfect for architectural, urban and street photography. Ultimately, choosing between photography’s two magical hours depends on individual preferences and shooting goals.
How To Use The Golden Hour To Enhance Your Photography
When it comes to enhancing your photography skills, understanding how to utilize the Golden Hour effectively is vital. Twice daily, during both morning and evening, the Golden Hour presents multiple opportunities for breathtaking photography.

Experiment with composition. While this magical hour creates soft lighting that illuminates everything, try playing around with new compositions.
Use leading lines, rule of thirds, and negative space creatively to capture unique perspectives. By experimenting with your angles, you’ll be able to craft fresh and dynamic shots.
Embrace bold colors. During the Golden Hour, the world transforms into a vibrant canvas bursting with hues of pink, orange, and red. These rich colors add depth and interest to any photo, so don’t be afraid to let them take center stage. Play up complementary colors by pairing oranges with blue shadows, or yellows against deep greens. By embracing bold colors during golden hour, you can create visually striking shots that pop off the page.
Capture moody skies. As the sun sets or rises, the sky explodes with drama and emotion. From billowing clouds to sweeping gradients, the sky provides endless possibilities for capturing moody shots. Try zooming in tightly on the action, or widening your lens to incorporate the whole scene. By focusing on the sky during the Golden Hour, you can create powerful images that stir the soul.
With practice and perseverance, anyone can learn to master the art of photography during the Golden Hour. By experimenting with composition, bold colors, and dramatic skies, you’ll soon be capturing breathtaking photos that stand out above the rest. So grab your camera, head outside, and see what the world looks like under the warm glow of the Golden Hour.
Preparing For The Golden Hour
Choosing The Right Location For Golden Hour Photography
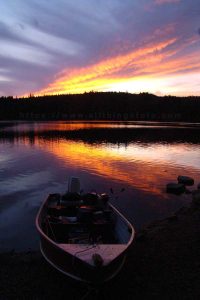
Choosing the right location for Golden Hour photography involves selecting spots where natural elements such as mountains, trees, water bodies, buildings, etc., offer visual appeal.
Pay attention to notable landmarks and structures that contrast with their environment. Things like interesting shapes, textures and silhouettes offer stunning photos.
Consider the light direction and angle, ensuring the subject receives indirect and warm light during the shoot.
Don’t forget about the “f8 and be there rule” when wanting to capture foreground details.
Explore different perspectives to find unusual viewpoints, and check weather forecasts to ensure clear skies during the Golden Hour. Additionally, consider visiting sites during low tide if they involve waterfronts to access more varied terrain.
Plan your route ahead, including transportation options, parking availability and potential hazards, so you arrive early enough to set up equipment and scout suitable spots before the actual Golden Hour begins.
All these factors will contribute to finding the ideal setting for your Golden Hour photography session.
The Importance Of Planning And Preparation For The Golden Hour
The Golden Hour is an exceptional opportunity for photographers to capture stunning landscape photos, but it requires careful planning and thorough preparation.
Research the best times for the Golden Hour based on your location’s latitude and season. Next, choose a compelling location that offers attractive features like mountains, trees, water bodies, or buildings, which receive direct yet diffused sunlight.
Check local weather reports to avoid cloudy days and plan accordingly.
Don’t forget to bring the essentials like tripods, filters and spare batteries. Also bring backup equipment in case something fails.
Set up your equipment early, allowing ample time to adjust settings according to the environment and light conditions.
Last but no least, keep an eye on the clock and be ready when the magic happens.
Planning and preparation play crucial roles in capturing exceptional golden-hour photos.
(Affiliate Link)

The Essential Gear For Golden Hour Photography
Taking advantage of the Golden Hour in photography requires having several key tools at hand. This includes both physical tools such as cameras and lenses and software tools used in postprocessing to enhance your final image.
The first tool required for Golden Hour photography is a good DSLR camera or mirrorless system camera. Both cameras allow interchangeable lenses, giving you greater flexibility to adapt to different situations. For example, wide-angle lenses can capture vast landscapes. While telephoto lenses can focus on distant objects.
High resolution sensors and fast autofocus capabilities also improve picture quality. In addition, it’s important to have sufficient memory cards to store large files generated by higher megapixel cameras.
Another tool necessary is a tripod. Since the Golden Hour often takes place shortly after sunrise or sunset, the available light tends to be dimmer than during midday. Therefore, slower shutter speeds are required to properly expose your photos. Which can result in blurred images unless a stable platform is used to support your camera. Using a remote trigger or cable release further reduces motion caused by pressing the shutter button manually.
Polarizing and neutral density (ND) filters are useful during the Golden Hour. A polarizer removes reflections, improves contrast and deepens blue skies. ND filters reduce the amount of incoming light, enabling longer exposure times to achieve creative effects like smooth water and clouds. Circular polarizers combine both functions into one filter, making them convenient choices for Golden Hour photography.
Finally, no discussion of Golden Hour photography would be complete without mentioning editing software. Import, organize, edit and share images seamlessly with Adobe Lightroom on your computer or mobile device. With its advanced color correction and tone mapping tools, along with presets specifically designed for Golden Hour photos, Lightroom makes it easy to process RAW images quickly and efficiently.
In conclusion, the Golden Hour presents photographers with a unique opportunity to capture beautiful photos using specialized hardware and software tools. However, success also requires proper planning and execution to fully leverage the advantages provided by these resources.

How To Use Natural Light To Your Advantage
Using natural light in photography is an essential skill for any photographer.
Tips For Using Natural Light In Photography
Pay attention to the direction and quality of the light. Soft, diffused light produces a warm glow and creates subtle shadows that add depth to your images. Hard, harsh light can create contrast but may also produce unwanted highlights or shadows.
Use the Golden Hour, which occurs at dawn and dusk when the sun’s angle is low on the horizon, to capture beautifully lit landscapes or portraits. The soft, warm light during this time adds a magical touch to your photos.
Finally, experiment with shutter speed to balance exposure between ambient light and other elements within the frame. A slower shutter will allow more light into the camera. A faster one allows less light in. Using different shutter speeds allows you to control how much detail shows up in your image.

Golden Hour Photography Techniques
Understanding composition and framing
During the Golden Hour, the warm, soft light creates stunning visual effects. However, capturing these moments effectively requires careful consideration of composition and framing techniques. Here are some suggestions:
Look for leading lines such as paths, roads or riverbanks to guide viewers’ eyes towards your main subject. These lines can be used to draw interest from the edges of the frame towards the center where your subject lies. The rule of odds is another great rule to learn for adding intrigue to your composition.
Keep the rule of thirds in mind by dividing your scene into nine equal parts using two horizontal and vertical lines each. Place important subjects along those lines or their intersections to enhance the image’s visual appeal.
Experiment with perspective by getting lower to the ground or higher above it. This technique changes viewpoints and provides fresh angles that showcase the beauty of the setting sun.
Don’t forget about negative space! Letting the surrounding environment take up part of the frame helps to emphasize the importance of the central element, making it stand out against its surroundings.
Remember, the key to effective compositions during Golden Hour is to pay attention to details and play around with different framing techniques until you find what works best for your shot.
Using Backlighting For Dramatic Effect
Backlit landscapes during the Golden Hour offer unique opportunities for creative expression. Optimize depth of field by setting the aperture between f/8 to f/2.8 when capturing shots towards the sun. This will keep all elements of the photo in focus. The warm, golden hues cast across the sky and clouds create a sense of drama and movement. Sunrays streaming through trees and buildings can create interesting patterns and textures, adding a dynamic element to your composition. Remember to include foreground interest to anchor the image and lead the viewer’s eye through the scene. With proper exposure and composition, backlit landscapes can truly captivate the imagination.

Experimenting With Different Exposures And White Balance
Adjusting exposure and white balance settings during the Golden Hour allows photographers to achieve desired tones and colors without relying solely on post-processing tools. Underexposure can darken scenes while overexposure results in blown-out highlights. Dialing in the correct white balance can neutralize color casts and bring out specific hues. Try bracketing multiple exposures for flexibility later on. Artistic choices made at the moment of capture often yield better end results than extensive editing.
Golden Hour Photography Tips and Tricks
How to avoid common mistakes during Golden Hour Photography
To minimize errors in Golden Hour photography, here are some tips:

Tips For Capturing Golden Hour Photography In Different Seasons And Weather Conditions
When taking photos during the Golden Hour in various seasons and weather conditions, consider adjusting settings accordingly. Modify your camera settings to account for the varying sunrise and sunset times throughout the seasons. Cloudy skies may require increased exposure, while clear skies could benefit from decreased exposure to maintain natural contrast. Autumn foliage can appear yellowish under warmer temperatures, so use manual white balance to tweak colors. Winter snow can also affect accurate color representation; again, utilize manual white balance to fine-tune images. Keep experimenting with different approaches to achieve optimal results.
The Importance Of Patience And Persistence During Golden Hour Photography
Capturing stunning shots during the Golden Hour requires patience and persistence. Wait for ideal cloud formations, changing light patterns, or simply enjoy observing nature while waiting for the perfect moments. Sometimes, one must remain stationary for extended periods, but being still offers time to reflect and appreciate the beauty of the surroundings. Stay focused, persevere, and be rewarded with breathtaking imagery.
Conclusion
In conclusion, Golden Hour Photography is a magical and captivating way to capture stunning photos using natural light. It is a time of day when the sun is low on the horizon, creating a soft, warm glow that enhances the colors and textures of the scenery. To make the most of Golden Hour Photography, it is essential to plan and prepare ahead, choose the right location and gear, and experiment with different techniques and compositions.
During Golden Hour, photographers can create breathtaking photos by using backlighting, capturing silhouettes, and experimenting with different exposures and white balance.
Editing Golden Hour photos requires a delicate touch to preserve the natural look and feel of the scenery, but there are many software and techniques available to enhance and refine the photos.
For advanced photographers, Golden Hour Photography offers many exciting opportunities, from nighttime Golden Hour photography to using props and models during the shoot. It is a versatile and dynamic form of photography that requires patience, persistence, and creativity.
In today’s modern AI driven photography, Golden Hour Photography is becoming increasingly popular, and for a good reason. It offers a unique and timeless beauty that captures the essence of nature and the world around us. So, whether you are a beginner or an advanced photographer, grab your gear, find the right location, and start capturing the magic of Golden Hour Photography.