- Now, Introducing The Sunny 16 Rule
- Applying The Sunny 16 Rule
- Advantages And Limitations Of Using The Sunny 16 Rule
- Tips for Success
- Fine-Tuning and Experimentation
- Practice Exercises
- Exercise 1: Sunny Day Scenes
- Exercise 2: Portraits in Open Shade
- Exercise 3: Backlit Subjects
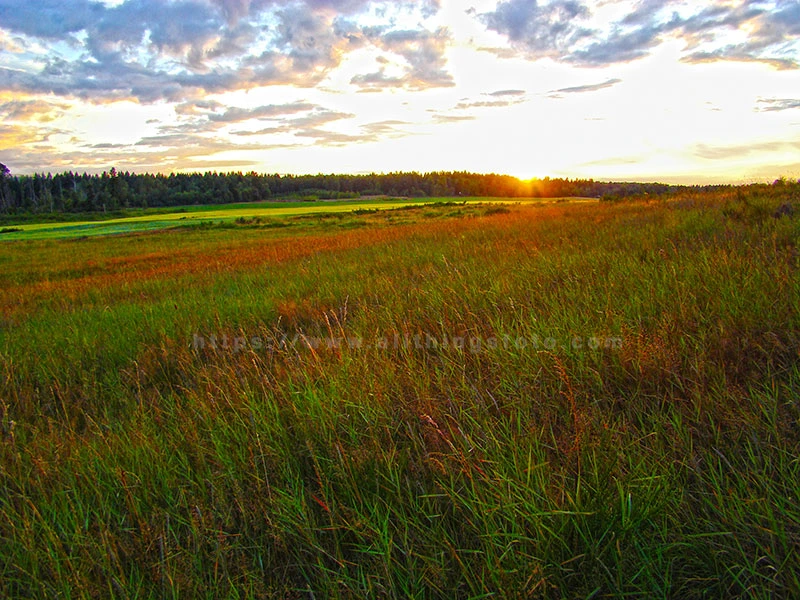
- Exercise 4: Silhouettes at Sunset
- Exercise 5: Fast-Moving Action
- Exercise 6: Long Exposures for Landscapes
- Exercise 7: Overcast Day Photography
- Exercise 8: Architecture and Cityscapes
- Exercise 9: Mixed Lighting
- Exercise 10: Golden Hour Close-Ups
- Summing Up The Sunny 16 Rule Explained
- Frequently Asked Questions
- Can I use the Sunny 16 Rule with digital cameras, or is it mainly for film photography?
- Is the Sunny 16 Rule still relevant in the era of advanced light metering and automatic exposure modes on digital cameras?
- What if my camera's aperture settings don't include f/16? Can I still use the rule?
- Are there any smartphone apps or tools that can help me apply the Sunny 16 Rule on my mobile device?
- When should I use the Sunny 16 Rule versus relying on my camera's built-in light meter or exposure compensation?
In the heart of a bustling city, as the sun dipped below the horizon, a seasoned photographer positioned herself on a rooftop, her camera poised to capture the perfect shot of the cityscape at twilight. The skyline glittered with a thousand lights, and the sky transitioned through hues of orange and purple.

As she framed the scene and pressed the shutter button, excitement coursed through her veins. But when she reviewed the image on her camera's LCD screen, disappointment washed over her. The photograph, which should have been a breathtaking portrayal of the city's vibrancy, was a murky, indistinct mess.

The reason? Exposure. Excited to capture twilight's colors, she overlooked adjusting her camera for changing light. Her image was either too bright, losing details, or too dark to show the city's beauty. It was at that moment she realized the critical role exposure played in photography.

The balance between aperture, shutter speed, and ISO - those seemingly technical settings were the keys to unlocking the magic of light and shadow, the vivid colors, and the intricate details that transform a snapshot into a work of art.

With newfound determination, she learned to master exposure, and in the years that followed, her photographs became windows to the soul of the world, capturing not just moments but emotions, not just scenes but stories. And that rooftop lesson remained etched in her memory, a reminder that in photography, as in life, the right exposure can reveal the extraordinary in the ordinary.
The scenario above illustrates the frustration felt when not understanding exposure and how important it is to capturing light. The sunny 16 rule in photography is a tool which helps photographers learn about exposure.
In photography, exposure is key, shaping both quality and impact. It determines brightness, contrast, and the photograph’s mood.
Proper exposure balances and sharpens image elements. Too much light leads to overexposure, washing out highlights and losing detail. Whereas too little light, or underexposure, creates dark, muddy, undefined areas.
Now, Introducing The Sunny 16 Rule
The Sunny 16 Rule is a valuable tool for achieving consistent exposure in various lighting conditions, especially when shooting outdoors. The rule offers guidance for adjusting aperture, shutter speed, and ISO for correct exposure, especially in bright sunlight. The Sunny 16 Rule helps photographers achieve balanced scenes, preserving details for impactful images.
History And Origin
During photography’s early days, especially in the film era, the Sunny 16 Rule became a fundamental concept. It traces back to the mid-20th century when manual settings were used and reliable light meters were scarce.
During the film era, when photographers had limited opportunities to review their shots immediately, and light meters were less sophisticated, the Sunny 16 Rule was a valuable tool. It allowed photographers to estimate exposure quickly and accurately without relying on external devices. This rule was particularly useful for photographers working with fixed ASA film.
Concept Of The Rule
Simplified, the Sunny 16 Rule pairs f/16 aperture with a shutter speed matching the ISO on sunny days. For instance, with ISO 100, use 1/100 second in bright sunlight.
In modern digital photography, where advanced cameras come equipped with precise light metering systems, some may question the relevance of the Sunny 16 Rule. However, it remains a valuable skill for several reasons.
Valid Reasons The Sunny 16 Rule Helps Photographers
Backup in Case of Light Meter Failure: In situations where your camera’s built-in light meter malfunctions or cannot provide accurate readings, the Sunny 16 Rule serves as a reliable backup for determining correct exposure settings.
Understanding Exposure Fundamentals: Learning and applying the Sunny 16 Rule helps photographers understand the fundamental relationship between aperture, shutter speed, and ISO, which is essential for mastering exposure in all conditions.
Creative Control: Some photographers still prefer manual control over their exposure settings to achieve specific creative effects, and the Sunny 16 Rule provides a straightforward method for doing so.
Film Photography Revival: With the resurgence of film photography, the Sunny 16 Rule is experiencing a revival, as many film photographers appreciate its simplicity and reliability.
In summary, the Sunny 16 Rule has a rich history dating back to the film era when manual exposure control was paramount. While modern digital cameras offer advanced metering systems, this rule remains relevant as a backup tool and a valuable means of teaching exposure fundamentals to photographers of all levels.
(affiliate link)
Applying The Sunny 16 Rule
Photographers use the rule to estimate exposure settings when in bright sunlight. Let’s walk through the process:
Practical Application
Summing Up The Sunny 16 Rule Steps
By following these steps and practicing the Sunny 16 Rule, photographers can quickly and confidently estimate exposure settings for bright sunlight conditions, ensuring well-exposed images with a good balance of light and shadow.
The rule applications will vary depending on the camera settings. For example: a camera that doesn’t have a shutter speed of 100 available will use 125 for ISO 100. A camera without 1/200 uses 1/250 with 200 ISO. And a camera without 1/400 uses 1/500 with ISO 400. You get the picture.
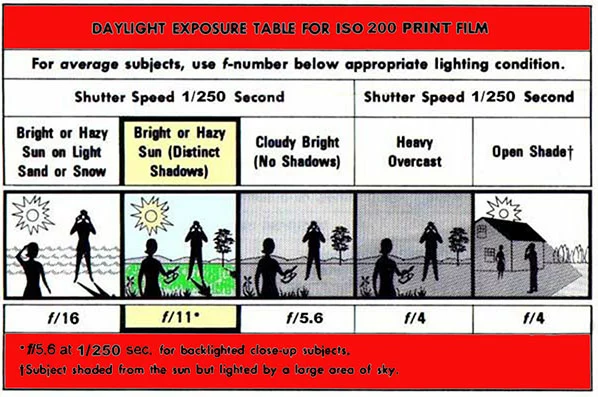
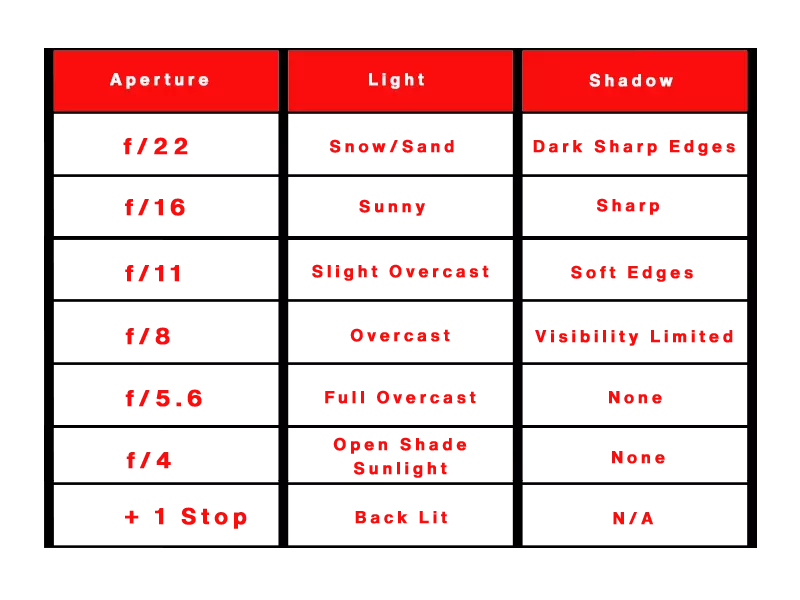
A more intricate Sunny 16 variation adjusts the shutter speed to correspond with the ISO and picks the f-number based on the table provided (below). Example: composition of a mountain scene on a slightly overcast day – 1/250, f11, 200.
Adjusting For Changing Conditions
The Sunny 16 Rule, while designed for bright, sunny conditions with clear skies, can indeed be adapted for various lighting conditions, including partly cloudy, overcast, or hazy days. Other rules like the rule of thirds, f8 and be there and framing your composition should be learned along with the Sunny 16 one.
Here are some tips on modifying settings when deviating from the f/16 baseline:
Partly Cloudy Days: On partly cloudy days, where sunlight intermittently breaks through clouds, you can start with the Sunny 16 Rule as your baseline. However, be prepared to make quick adjustments. When the sun is shining, stick with f/16 and the reciprocal of your ISO for shutter speed. But when clouds temporarily obscure the sun, you may need to open up the aperture (lower f-number) to let in more light. Try f/11 or even f/8 to maintain proper exposure.
Overcast Days: Overcast conditions mean less intense, diffused light. Start by opening up the aperture significantly from f/16. Consider kicking things off with f/8 or f/5.6 as your starting point. Make sure your shutter speed matches your ISO choice. If your ISO is 100, your shutter speed should be 1/100 second. Overcast conditions change rapidly, so tweak your settings according to the changes.
Hazy or Smoggy Days: In hazy or smoggy conditions, use f/4 or f/2.8 to get more light. Ensure your shutter speed matches your selected ISO. If your ISO is 100, set the shutter speed to 1/100 second. Remember, haze can add a creative, subtle touch to your images.
Very Overcast or Low-Light Conditions: During heavy overcast or low-light situations, substantial adjustments from the Sunny 16 Rule may be necessary. Choose f/2.8 or f/1.4 and go for a slow shutter, around 1/50 seconds or slower. Be cautious about camera shake when using slow shutter speeds. Consider using a tripod or image stabilization if available. Or, you might raise the ISO for a faster shutter speed with a wide-open aperture.
Summing Up Adjusting For Changing Conditions
Remember, photography is about experimenting and personal taste. Keep in mind, you need to understand that changing light affects exposure and you’ll need to tweak your settings. Increasing ISO will increase noise in your end result. You’ll need to decide how much noise is acceptable depending on your style. Practicing in different lighting conditions improves your Sunny 16 Rule skills.
Advantages And Limitations Of Using The Sunny 16 Rule
The Sunny 16 Rule offers a host of benefits, including quick and accurate exposure settings, independence from light meters, consistency in results, increased creativity, time and resource savings, enhanced learning, suitability for remote locations, versatility, confidence-building, and a strong foundation for advanced photography techniques.
Advantages Of Using The Rule
Quick and Accurate Exposure Settings: The Sunny 16 Rule provides a straightforward and reliable method for estimating exposure settings, allowing photographers to quickly set up their cameras for well-exposed shots in bright sunlight without the need for light meters or complex calculations.
Independence from Light Meters: One of the primary advantages of the Sunny 16 Rule is its independence from light meters, which can be expensive, require calibration, and may not always be available. This rule empowers photographers to work confidently without relying on additional equipment.
Consistent Results: By following the Sunny 16 Rule, photographers can achieve consistent exposure results in various outdoor lighting conditions, ensuring that their images have the right balance of light and shadow. This consistency is valuable for creating a cohesive portfolio or maintaining a specific photographic style.
Creativity Boost: While the Sunny 16 Rule provides a solid baseline for exposure, it also encourages photographers to experiment and adjust settings creatively. By understanding the rule’s principles, photographers can make intentional deviations to achieve specific artistic effects.
Saves Time and Resources: With the Sunny 16 Rule, photographers can save time by not having to take multiple light meter readings or make constant exposure adjustments. This can be particularly useful in fast-paced shooting scenarios.
Increases Learning: Using the Sunny 16 Rule helps photographers better understand the relationship between aperture, shutter speed, and ISO, which is essential knowledge for mastering exposure in photography. It encourages learning through practice and experience.
Useful in Remote Locations: In outdoor or wilderness photography, where access to electricity or electronic equipment may be limited, the Sunny 16 Rule is an invaluable tool for obtaining proper exposures in rugged and remote settings.
Versatility: While initially designed for film photography, the Sunny 16 Rule is equally applicable in the digital age. It works for both film and digital cameras, appealing to a wide range of photographers.
Increase In Confidence: When photographers learn the Sunny 16 Rule, their confidence in controlling exposure grows across lighting conditions. This confidence allows for greater creative freedom and artistic expression.
Baseline for Advanced Techniques: Understanding the Sunny 16 Rule serves as a foundational skill for photographers, enabling them to build upon it and explore more advanced exposure techniques, such as bracketing and HDR photography.

Limitations And When Not To Use It
The Sunny 16 Rule is a valuable tool for outdoor photography in bright, sunny conditions, but it may not be the best choice in the following situations:
Poor Illumination: The Sunny 16 Rule is designed for bright sunlight. In low light, like sunset or dim environments, the rule can lead to underexposed images. In such instances, you can opt for a wider aperture, slower shutter, or higher ISO.
Capturing Photos Indoors: When shooting indoors, especially in spaces with limited natural light, the Sunny 16 Rule is not applicable since it doesn’t consider indoor lighting conditions. Indoor photography typically requires adjustments to the aperture, shutter speed, and ISO based on the available light sources and desired effects.
Artistic Exposure Variations: If you’re aiming for specific creative effects in your photos, such as intentional motion blur, long exposure light trails, or a shallow depth of field, the Sunny 16 Rule may not provide the settings needed to achieve these effects. Creative photography often involves deliberately deviating from standard exposure rules to achieve artistic goals.
Fluctuating Weather: The weather can shift suddenly. If clouds suddenly obscure the sun or if the weather transitions from sunny to overcast, the Sunny 16 Rule may become inaccurate. In such situations, it’s essential to be flexible and adjust your settings accordingly.
Multiple Sources of Illumination: When you have mixed lighting conditions within a single frame, such as a subject in bright sunlight against a shaded background, the Sunny 16 Rule may not provide optimal exposure settings for both elements. In these cases, manual exposure adjustments or advanced metering techniques may be necessary.
Precise Exposure Control: In situations where precise exposure control is critical, such as professional studio photography or when working with high-contrast scenes, relying solely on the Sunny 16 Rule may not provide the required accuracy. These scenarios often benefit from careful metering and precise adjustments.
Summing Up The Advantages And Limitations
While the Sunny 16 Rule is a valuable guideline for outdoor photography in bright sunlight, photographers should be aware of its advantages and limitations. Be ready to adapt your exposure settings based on the specific conditions, creative goals, and desired results of your photography.
Tips for Success
Below I provide you with some tips and practical exercises for success in your endeavor to become a better photographer. The Sunny 16 rule is just one step to understand but it gives you a baseline from which to work from. If you practice tweaking your exposure settings using the rule as a guide you will become a better photographer.
(affiliate link)
Fine-Tuning and Experimentation
Unlocking the full potential of the Sunny 16 Rule is like embarking on an exciting photographic adventure. It’s a journey that involves not just understanding the rule but also practicing, experimenting, and fine-tuning to make it your own.
First and foremost, don’t be afraid to dive in and practice using the Sunny 16 Rule in various outdoor scenarios. Embrace bright sunlight, explore the world around you, and see how this rule can help you capture those perfect exposures. With every exposure, you become more experienced and confident.
Photography is an art, and your personal style is what defines you from everyone else. By creating different exposures using the Sunny 16 rule, your vision comes to light. Want to emphasize motion in a sports shot? Use slower shutter speeds. Craving that dreamy background blur in a portrait? Wider apertures create blurred backgrounds.
Fine-tuning is about tailoring the rule to your unique style and preferences. It’s the moment when you transform from rule-follower to rule-master.
So, fellow photographers, I encourage you to embrace the Sunny 16 Rule as your trusty companion on your photographic journey. Practice, experiment, and fine-tune your way to becoming proficient in using it, and watch as your images come to life in your own distinctive way.
Oh and don’t forget to embrace change as it is the canvas of photography. Happy shooting!


Practice Exercises
Exercise 1: Sunny Day Scenes
On a bright, sunny day, find a simple scene with good contrast between light and shadow. Use the Sunny 16 Rule to determine your initial exposure settings (e.g., ISO 100, f/16, 1/100 seconds). Take multiple shots of the scene, adjusting only one exposure setting at a time. Start by changing the aperture, then the shutter speed, and finally the ISO. Observe how each adjustment impacts the exposure and the mood of your photos.
Exercise 2: Portraits in Open Shade
Look for a location with open shade, such as under a tree or a building’s shadow, on a sunny day. Place a subject in the shade and use the Sunny 16 Rule as a starting point. Experiment with different apertures to control the depth of field and create pleasing background blur. Adjust the ISO and shutter speed to maintain the proper exposure.


Exercise 3: Backlit Subjects
Find a subject that’s backlit by the sun, like a person standing in front of a bright window or a landscape with the sun behind the subject. Apply the Sunny 16 Rule, but this time, experiment with adjusting exposure compensation to balance the subject and the background. Practice using exposure compensation to achieve pleasing results.
Exercise 4: Silhouettes at Sunset
During the golden hour, capture dramatic silhouettes using the Sunny 16 Rule. Find a subject with a strong outline against the setting sun. Set your camera to the rule’s baseline settings and focus on the subject’s outline. Experiment with different subjects and positions relative to the sun to create striking silhouette photos.
Exercise 5: Fast-Moving Action
If you’re near an area with fast-moving subjects, such as birds in flight or sports activities, apply the Sunny 16 Rule with appropriate settings and capture action shots. Practice adjusting your shutter speed to freeze motion or create intentional motion blur while maintaining proper exposure.
Exercise 6: Long Exposures for Landscapes
In low light conditions during sunrise or sunset, use the Sunny 16 Rule as a starting point for landscape photography. Experiment with longer exposures by reducing your aperture (e.g., f/22 or smaller) and adjusting the ISO to capture stunning, dreamy long-exposure reflection landscapes.
Exercise 7: Overcast Day Photography
On an overcast day when the lighting is diffused, practice using the Sunny 16 Rule. Apply the rule’s baseline settings, but then experiment with opening up your aperture and adjusting the shutter speed to create different moods in your images. Overcast days provide excellent opportunities for soft, evenly lit scenes.
Exercise 8: Architecture and Cityscapes
Apply the Sunny 16 Rule to capture architectural details or cityscapes in bright daylight. Experiment with different compositions and focal lengths. Adjust settings to balance the exposure between the building or skyline and the surrounding environment.
Exercise 9: Mixed Lighting
When shooting in environments with mixed lighting conditions, like a city street with neon signs or a forest with dappled sunlight, practice using the Sunny 16 Rule to maintain proper exposure. Fine-tune your settings to handle the varied sources of light while capturing the scene’s character.
Exercise 10: Golden Hour Close-Ups
During the golden hour (shortly after sunrise or before sunset), focus on capturing close-up details like flowers, leaves, or textures using the Sunny 16 Rule. Experiment with different angles, apertures, and focal lengths to create beautiful, warm-toned close-up shots.
These exercises will not only help you become proficient in using the Sunny 16 Rule but also enhance your overall photography skills. As you practice and experiment with this rule in various outdoor scenarios, you’ll develop a deeper understanding of exposure control and how it can be tailored to your creative vision.


Summing Up The Sunny 16 Rule Explained
The Sunny 16 Rule, a valuable tool in the photographer’s toolkit, offers a straightforward method for achieving consistent exposure in various lighting conditions, especially in bright sunlight. It simplifies the complex relationship between aperture, shutter speed, and ISO, providing quick and accurate exposure settings.
We explored the history and origin of the Sunny 16 Rule, tracing it back to the film era when it was indispensable for photographers working with limited resources. Even in the digital age, it retains its relevance for several reasons, serving as a backup in case of meter failure, fostering an understanding of exposure fundamentals, enabling creative control, and experiencing a revival in film photography.
I delved into practical applications, providing step-by-step guidance on how to use the rule effectively, from assessing lighting conditions to fine-tuning for creative effects. Additionally, I discussed how to adapt the rule for different lighting scenarios, such as partly cloudy, overcast, or hazy days.
Furthermore, I highlighted the advantages of the Sunny 16 Rule, including quick and accurate exposure settings, independence from light meters, consistent results, increased creativity, and its suitability for various situations. However, I also acknowledged its limitations, particularly in low light conditions, indoor photography, and when specific creative exposure effects are desired.
Finally, I emphasized the significance of practice, experimentation, and fine-tuning the Sunny 16 Rule. Mastery of this rule is a journey of discovery, allowing photographers to unlock their unique creative potential while capturing the beauty of the world around them.
Understanding and mastering exposure is the key to transforming ordinary scenes into extraordinary works of art, and the Sunny 16 Rule serves as an invaluable guide on this photographic journey. So, embrace the rule, explore its possibilities, and let your personal style shine through your images.