- Introduction To Framing In Photography
- Leading The Eye Of The Viewer With Framing
- Framing In Photography With Natural Elements
- Framing in Photography Using Architectural elements
- Framing In Photography Using Geometric Shapes
- Examples Of Framing Photography
- #1 – Archways Make Excellent Frames
- #2 – Using Branches, Bushes And Trees For Framing in Photography
- #3 – Using People As A Frame In Your Photo
- #4 – Doors & Windows For Framing in Photography
- #5- Play Equipment Works For Framing in Photography
- #6 – Light & Shadows For Framing in Photography
- #7 – Tunnels Are Another Excellent Way To Frame A Photograph
- #8 – Mirrors Work For Framing in Photography
- #9 – Use An Umbrella For Framing in Photography
- #10 Colors Make For An Interesting Frame
- Framing Photography Conclusion
- FAQ
Framing in photography means how you will compose your image. Think of the frame as the horizontal or rectangle shape your photographic image resides in. This frame is also referred to as landscape or portrait. Composition or framing in photography uses many different approaches to direct the viewers attention to the subject matter.
Introduction To Framing In Photography
When you hold up the camera and look through the view finder you create a framed image. The most effective photographers understand the use of creative frames for shooting images with strong effects. Use of carefully constructed frames is a great way is to ensure viewers eyes focus the subject of a photograph. Frames help to create an illusion of balance in a photograph. Using the correct frames can transform an otherwise unremarkable photo into an attractive one with an engaging feel.
Framing techniques are techniques for composing which use various elements of an image to emphasize and draw attention to its main subjects. For example you could use doors, windows, grass or trees as frames of an image. This method is a way to make an interesting topic. By framing your pictures you increase their value and significance making them attractive. The eyes of the audience may find the frame appealing for aesthetics. This technique has an ultimate purpose: create an increased visual relevance for the subjects in a picture. When used with photography’s rules like the “Sunny 16 Rule”, “F/8 Rule”, Rule of Odds and “Rule of Thirds” your photos become exceptional.
Leading The Eye Of The Viewer With Framing
As stated above, the frame can assist in attracting viewers to certain topics. Some compositions contain more than one element within a frame that a viewer may not understand. Using frames as the lead line shows the viewer the right way for a picture’s presentation. Put your subject inside the frame to make sure viewers understand the images you shoot. It is possible to experiment with different forms of framing and re-position yourself to try different perspectives. Try focusing on your subject and selecting a wider aperture to blur the background which frames your subject.
Framing In Photography With Natural Elements
Nature provides us with an unlimited number of composition choices. Finding the right frames instinctively in the natural environment takes practice and perseverance to acquire the skills necessary for success. Along the way you should observe everything in your view finder that compliments your photo.
Objects like bushes, grass, trees and other vegetation provides excellent framing opportunities. Rock walls or arches also give your image a great frame to use which highlights your subject matter. The weather provides outstanding framing options when used correctly. Rain and fog not only provide a framing opportunity but also adds to the story your photo tells.
For example, capturing someone under an umbrella in the rain contains two frames to direct the viewer to the subject. The umbrella is the main frame with the rain in the background as a secondary frame. Try experimenting with different shutter speeds and apertures to get your desired effect of the rain patterns.
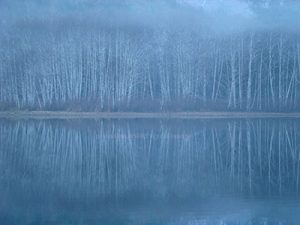
Malispina Lake in the image to the left shows how fog eliminates most of the background noise like trees and mountains. The viewer’s focus is now drawn to the deciduous trees on the shoreline and their reflections on the lake. It also adds a feeling of peace and quiet.
Shooting traffic on a freeway or back road in the fog is another way to frame your subject effectively. Fog also provides an excellent frame in a landscape photo to draw attention to the subject.
Framing in Photography Using Architectural elements
Man made architecture provides great inspiration for forming frames in photography. The frame you have for your subject can be made by using doors or windows. Start by using your home for frames to highlight your subject. You will create many memories of your home! The use of door frames or keyholes would certainly make an impression on people viewing your work.
In real life, architectural elements often have a story behind them. Try to capture the moment in the correct frame. All that is required in order to create an unforgettable photo is your imagination.
Experiment with different focal ranges using various lenses to find the right perspective you’re trying to convey. Sometimes a different lens tells your story how you want it told. Be creative and think outside the box and remember, if at first you don’t succeed try again!
Framing In Photography Using Geometric Shapes
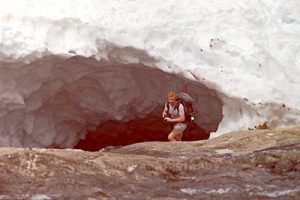
Geometric shapes mean various shapes in the world. However, their form must be complete. It is either a circle, spiral, square, triangle or rectangular. Ensure the shape around your subject is obvious. The photo to the left shows how I used an ice cave to draw your attention to the hiker.
The story is about me and a close friend hiking a local glacier and the size of the caves on this glacier. Here I used two subjects, the cave itself and my friend to show depth. The cave is the main frame but the glacier and land provide extra framing to complete the photo.
Examples Of Framing Photography
#1 – Archways Make Excellent Frames
Architecture provides many outstanding props for framing your images. Arches are one of these props when used properly give your photo balance and symmetry. An arched garden trellis is used effectively in wedding photography to emphasize the bride and groom or just the bride.
Use an arched entrance like a door or window and shoot the outside landscape through it. By finding one with no inside lighting you can also create a silhouette effect adding to the frame.
#2 – Using Branches, Bushes And Trees For Framing in Photography
Branches, bushes and trees provide an excellent framing opportunity for your photo. Placing your subject under a branch or branches has the desired effect of focusing attention on said subject. Having someone laying in the grass or bushes while peering through them at the camera will also frame your subject.
Landscape photography works well with branches, bushes and trees for framing. A lake shoreline with mountains in the background framed by any of these options looks amazing. Sunset and sunrises also look awesome using this framing technique.
#3 – Using People As A Frame In Your Photo
Lots of times when shooting portraits of people you can have them pose a certain way that frames themselves. For example, placing both their hand on top of their head creates a frame that focuses on their face.
Another example is to use a person standing to one side of another person and focus on the main person. The individual standing to one side acts as a frame which draw your attention to the other person.
Try placing your family in a group and using a telephoto lens focus on a smaller individual. Use a wider aperture to blur out the others which also acts as a frame.
#4 – Doors & Windows For Framing in Photography
Both doors and windows are really simple introductions to framing. They do this really well and they’re available everywhere you go – even home!
You could take pictures from inside a door looking out at your subject. You can use the door entrance to frame a portrait or family photo both from the outside or inside. A window can also use this technique very well.
Using the window you place your subject in front and shoot out. Be careful to pay attention to the back light behind the window. Take advantage of the curtains to filter the back light or a bright background. A dirty window can ruin a great shot so ensure it is clean with no streaks.
From outside the window shooting in, place someone inside looking out. The resulting image will give your viewer a sense of what lies behind the house walls. This style of framing in photography is used to provoke curiosity in your intended viewers.
#5- Play Equipment Works For Framing in Photography
Try going to the local playground or school yard to find great framing prop when shooting children. Remember to not include others in your photo without a signed release form! Shooting your own family and friends is okay, but respect privacy issues and avoid law suits. Use the monkey bars or those large concrete tubes. You can find lots of different objects to use when framing your subjects. An added bonus is the many vibrant colors usually associated with playgrounds.
#6 – Light & Shadows For Framing in Photography
Pockets of light offer a perfect opportunity to integrate framing, which is often missed, if not always! The shadows surrounding the patch of light form our subject. Street photography uses this method of framing regularly.
Choosing a backlit subject surrounded by shadows will provide you with a great frame in your image. One article I read a few years back showed the light source being a flashlight at night while camping. The photos were awesome and the darkness framed the tent and log cabin which was lit up by the flashlight. A tripod is definitely a must for this type of shot but the results are nothing short of amazing!
#7 – Tunnels Are Another Excellent Way To Frame A Photograph
Ever seen a photo of a train exiting from a tunnel? This type of framing a subject is popular as it uses the tunnel effectively to highlight the train. Tunnels can be anything from a cave, highway tunnel to a stand of trees that over grow a dirt road. Remember that famous shot of the vehicle driving through the giant Redwood Tree in California?
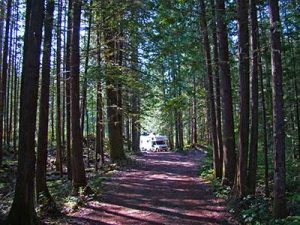
Here is an image I shot one day camping at Patterson Lake on Vancouver Island Canada.
The image leads you through the trees which form a tunnel to the RV at the end of the road.
The owner of the RV liked the shot so much he purchased it from me which was an added bonus. Sometimes tunnels exist in nature through various means like the overhanging trees, caves, hollowed out trees or stumps and even brush.
#8 – Mirrors Work For Framing in Photography
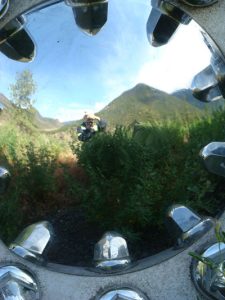
Mirrors provide an excellent way to frame your subjects by reflecting them for all to see. Taking a selfie with using a mirror is a popular way to frame your subject namely you! Mirrors are located everywhere including your home, stores, automobiles, change rooms, sports venues and carnivals.
Before taking your photo check out the background and make sure your flash is disabled. A cluttered background or flash can distract your viewer from your actual goal. I took this photo on the right using my chrome hubcap as a mirror to capture the image behind me. Notice how the reflection of the lug nut caps create a frame within a frame. The focus could have been much better in this image but it showed what I was trying to do.
If you don’t want yourself in the picture try using a tripod and a remote to trigger the shot. An auto timer on your camera will do the same thing.
#9 – Use An Umbrella For Framing in Photography

Umbrellas add an ideal frame for shooting portraiture shots of people. Use them rain or shine to provide perfect framing in photography while adding personality to the image. Umbrellas used to frame objects works well also as seen by this image with the boots in the rain.
Think outside the box when using umbrellas to frame your subjects. Many different perspectives exist in photography when using props.
#10 Colors Make For An Interesting Frame

Using colors to frame your subject in photography is quite common and when done properly creates a vibrant image. Not only is your viewer directed to the subject effectively but the overall image is pleasing to the eyes.
Take the image on the left, it uses the colors in the sky to frame the Canada Geese. The image is much improved by the vibrant color hues reflecting off of the clouds.
You can also use one color like a green leaf treed background or a white wall etc. Try to place your subject off of center to maintain uniformity in your photo.
Framing Photography Conclusion
Most experienced photographers incorporate some style of framing into their composition instinctively. As a beginner, your goal should be to focus on finding ways to frame your subject until it becomes second nature. Use all the tools from your artificial intelligence driven dslr camera to finish up after framing your image.
Framing photography becomes more natural with lots of practice and awareness of your surroundings. Photography composition is improved when you frame your subject which draws your viewer’s attention to the main element.
When shooting your photos look for natural framing objects like branches, bush, light, shadows and trees. Also try to find interesting objects like archways, mirrors, other people, tunnels, a window etc. to draw the viewer’s eye. Landscape photography provides many objects perfect for framing your subjects. Check out my article on 118 Insights Beginners May Not Know About Landscape Photography.
Remember to focus on your subject and not the frame. This ensures your viewer’s attention is directed at your subject whatever it may be.
Framing provides depth of field and helps creates symmetry in your image. Don’t forget to use the golden hour light to add surreal effects to your framed photos. You can find any of the above examples to framing anywhere and limited only by your imagination.
